Once reviewing the brief I then began to think about what sort of concept set I would create for this project, I decided on going with character/creature as I am already doing a set of concepts for the group project. I then began to look into character concepts to start coming up with a rough theme for my own set of concepts. After much research I finally decided on creating a robotic character/creature as I this will give me the most freedom in my concepts and really allow me to go wild with silhouette style and colours to bring the concepts to life.
I firstly began the project by creating a visual reference board of robotic character/creature concepts already out there to start getting some inspiration for my own project. From my visual board I have decided on the idea of creating a more creature style concepts and vary away from the human form as I believe this will give me the most creative freedom to play around with shapes and colours. The next stage is to begin planning the back story of the character before moving onto initial sketches.

Robot Visual Board
I then started on creating a one sheet for my character concept. After referring back to my visual board I decided I liked the top right three the best and decided to base my own character on the small robot style. I firstly began by thinking about the purpose of the small robot and this helped me create the backstory of belonging to a child, hence the link to being small. I then began by thinking about the personality, likes, dislikes etc to help bring the character idea to life. I then decided on a name thinking about technical objects and terms and decided on the final name of 'Gigabit'. I also included some reference images of small robot concepts on this rough draft of the one sheet, which will later be replaced with my own sketches of the character. Overall I am really pleased with this idea for my character and am really excited to begin concepting the character.

Gigabit One Sheet

Robot Studies
The next stage in the project was to start getting down some rough silhouettes for 'Gigabit' to start getting a feel for what I wanted my robot to look like. I firstly began by trying out a sheet of a variety of different silhouettes for the character and then took three forward and duplicated them, trying out variations of each silhouette, by making small changes to try and come up with a final design. After creating this sheet I am still not happy with any of my silhouette designs, so I'm going to continue creating silhouettes until I find one that will be interesting enough to work up. After revisiting my silhouette pages, I decided I liked the head on the silhouette (Last, Top Row. Variations Page) but did not like the rest of the body, after trying to combine different parts of silhouettes together and still not liking the outcome, I then began to think about the head I liked and what each part could be. I decided on the idea of using the points as big ears to account for the ability of super hearing, and then came up with the idea of using a fennec fox and dropping the character onto 4 legs and creating a fennec fox robotic style character. I will now begin creating a page of silhouettes for this character and then take this forward to start working up.

Silhouettes Page One

Silhouettes Variations

Combining Parts of Silhouettes

Fennec Fox Visual Board

Fennec Fox Silhouettes

Fennec Fox Silhouette Workups

Fennec Fox Rough Sketches
After creating some rough sketches and deciding on my overall design for 'Gigabit', I then decided the best course of action would be to model a low poly version of him and then z-brush this before taking screenshots and then painting over these for the model sheet, as for me this will be the quickest and most effective way to produce proportionate drawings. To start this process I first started by getting together some low poly model references, to start looking at meshes and structure.

Low Poly Model References
After consulting the lectures I decided the low poly method for my fox would not work and I also needed to complete some anatomy studies before progressing forwards to better understand how the joints work on the fox and how the design needed to change slightly to allow movement. I firstly started by gathering together some images of both foxes and other animals and then copied and completed some anatomy studies from these before moving onto creating my own fennec fox study from basic movement structure to full skeleton and muscle structure and then my re-designed fox on top of this. By completing this set of exercises it allowed me to understand how the animal works and moves and how my original design was flawed and would not work practically with basic movement. I am now much happier with my new design and will move forward to the modelling stage to help with the final modelling sheet.

Anatomy Visual Board

Anatomy Studies

Fennec Fox Build up Studies
After completing my reworked design I then began the modelling process, again after consulting lectures, I decided the best method would be to create my fennec fox in parts and model each part simply in Maya and then take these parts in z-brush, add detail and put together to create my final model before taking screenshots back into Photoshop to work up for the final model sheet and posed concept. However after trying this method I found it easier to model a skeleton in Maya and then build parts and duplicate across whilst scaling and rotating to cover the skeleton and create the final model. I then took this model into ZBrush and added details such as screws and wires to bring the fox to life and then took screenshots ready for the model sheet paint overs and the posed paint over.

Fox Skeleton - Backbone

Fox Skeleton - Ribs Added

Fox Skeleton - Hind Leg Added

Fox Skeleton - Hind Legs in Place

Fox Skeleton - All Legs Added

Fox Skeleton - Final Base

Fox Skeleton - Basic Plating Added

Fox Skeleton - Back Plates Added

Fox Skeleton - Ears to Finish

Fox Work up - Front View

Fox Work up - Side View
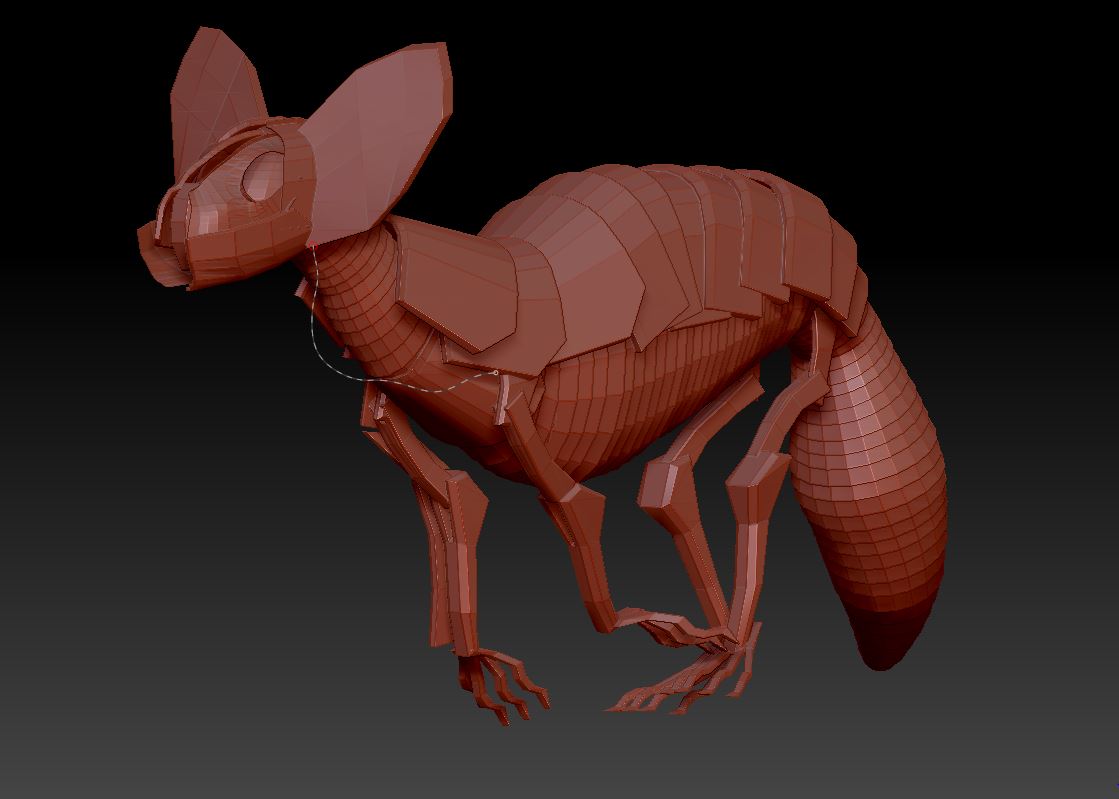
Fox Work up - Posed View
The next stage in the process now I have a lit and worked up model is to take these screenshots into Photoshop and use the paint over method to create both my model sheet and my posed view of the final character. In this stage I will add colours and final textures to really bring the character to life and create my final model sheet and posed views.

Final Fox Render - Front View

Final Fox Render - Side View

Final Fox Render - Model Sheet

Final Fox Render - Posed View

Final Fox Render - Posed With Background
Overall I have found this project both challenging and interesting. Coming up with my own concept and having free reign to concept whatever I wanted was fun and gave me creative freedom to make something unique. I found the modelling part of the project challenging as the concept was both hard surface and organic modelling which was a challenge, however I am very pleased with the final outcome and by doing the modelling side of the project it made the model sheet and posed view much easier to complete. If I had more time on the project I would have created some more development work and played around with the character a bit more and probably have designed some inner workings for him, however overall I am very pleased with the final outcome.


