Stage One - Finding Reference Images
To start off the project I first began by searching the internet for an item I would like to model into a Triple A, detailed model. I looked at a variety of objects such as weapons, toys, clothing items, cameras etc and finally settled upon modelling a wooden toy carousel, as it visually interesting and I felt as though it would be up to my skill level of modelling, where I could make it detailed but not too complicated for the time frame I had for the project. Once settled with my choice I gathered a variety of images of my object from different angles and created a mood board of my choice to work from.
Stage Two - Modelling The Base
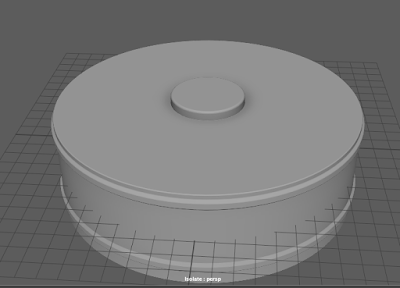
I then began modelling my asset, firstly starting with the base working from my reference images. I began with cylinders and built them up in layers, beveling the edges to create a smooth overall finish. The base is simple and as high detailed as I can get it for this stage whilst matching my image, however I will now move onto the next stage adding more detail to the underside of the base.
Stage Three - Adding Detail To The Base
I then added details to my base such as the legs for the model to stand on and the screws which hold the carousel together. Again these assets are simple but help to bring the model to life and match my reference images. When modelling these I again started with cylinders for the legs and a scaled out cylinder for the head of the screw. I found the screws the most complicated part of this stage as there was lots of beveling and extruding to create the realistic level of detail.
Once happy with the base I then added in the central column for the base using a cylinder and bringing this down into the base to merge into one object. I will now move onto adding the top of carousel.
Stage Five - Adding The Top Of The Carousel
I then added the top to my carousel model to bring the model together and create the base detail level for my overall finished model. I used another cylinder for the bottom half of the roof and beveled the edges and then selected certain edges and extruded them upwards using soft select to create a gradual raise to add detail. I then added another cylinder within the outer cylinder and extruded up the central point to create the top point of the roof.
Stage Six - Adding Detail To The Roof
I then began adding detail to the roof by adding spheres on the raised points to match my reference images. I created the sphere on top first and merged it on top of the point and made this sphere fairly large and then duplicated this for the lower spheres and scaled them down and duplicated across to create the roof details.
I then added another set of cylinders for the poles that the horses sit on to rotate around the carousel and scaled these to be really tall and slender and placed them at four even points on the model ready for the horses to be added.
I then started modelling the horses to go onto my carousel model. I created these by using the quad draw tool learnt in our class sessions when making the combat knife, and extruded outwards to the desired thickness of the horse. I then began adding details to bring the horse to life ready for textures such as extruding out chosen faces to create hair details on the mane and tail and also for the saddle. Overall I am really pleased with the horses and feel as though they clearly represent a horse and have nice details to bring them to life without making them too complicated to texture. Once happy with my horse model I then added this onto my carousel model and moved and rotated the model until it sat perfectly on the poles and then duplicated this model and rotated each one around to fit the poles and create the illusion of them turning around.
Stage Ten - Creating the Low Poly Model
After considering the correct approach and asking for help from my lecturer for creating my low poly version of my model, I decided to create this version by taking my high poly model and going through and deleting unseen faces and multiple edges and vertices to take the poly count down by more than half. By doing this method it was the quickest and most efficient way as well as retaining the original shape of the model and not losing too much detail for the final process. I also created a version with and without the multiple horses, again after conferring with my lecturer deciding on sticking with the version with one horse and pole so to save unwrapping the same UVS multiple times in the next stage.
Low Poly Model With All Components
Final Low Poly Model With All Necessary Components
Stage Eleven - Z-Brushing The High Poly Model
After creating my low poly version of the model, I then began the next stage of the process by taking this version into Z-Brush and Z-Brushing on extra details like the mane and saddle on the horse and the details on the main carousel such as the base details and the top details and also adding colour ready for the colour map on the entire model, using light blue and gold to match my reference image. To add the details on the main carousel on the base and top I found the easiest way was to create my own alphas in Photoshop using a white on black pen tool and then saving this and importing this into Z-Brush under the alpha section and changing the paint tool from freehand to drag out and dragging the details onto my final model. Overall I am really pleased with my high poly model at this stage and with the added details, this really helps bring the overall model to life and match the reference image more closely and look a little less blocky.
Base Alpha
Top Alpha
Horse Z-Brush
Horse Z-Brush Colour
Carousel Z-Brush
Stage Twelve - Unwrapping The Low Poly Model
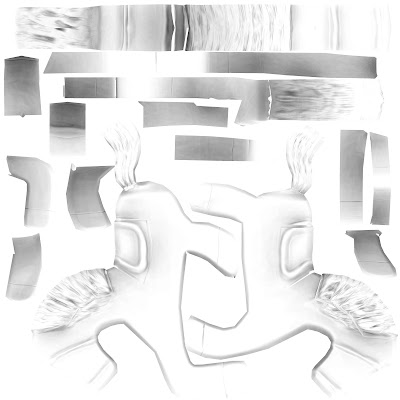
After Z-Brushing my high poly version of the model, I then began the next stage of the process by UV unwrapping this version ready to take into x-normal along with the high poly files created in Z-Brush. I firstly began by UV unwrapping each piece of the model using an automatic unwrap and then unwrapping the simpler pieces of the model such as the base, feet, balls and horse pole and then moved onto more complicated pieces of the model such as the top of the carousel and the horse. To UV unwrap the top of the carousel I had to unwrap the model using a planar map from the top view and also planar maps from the side view to create the final layout. To UV unwrap the horse the process was much more complicated, I firstly had to start by splitting the UVs into sections on the horse such as: both sides of the horse, the back piece, the legs and the underbelly. Once split into sections I then had to planar map each section along the appropriate axis (X,Y,Z) to create the final UV layout. I then used the unfold and layout functions within the UV editor to create the final UV unwrap of the horse. After creating all my UV's the next stage was to take everything into X-Normal to create all the necessary maps (Normal, Ambient Occlusion, Cavity and Colour Map) and to do this I then exported all the high poly parts out of Z-Brush, keeping the horse and carousel as two separate objects and exported the same from Maya, making such to keep them as an .OBJ file type.
Big Ball UV Unwrap
Carousel Central Column UV Unwrap
Feet UV Unwrap
Horse UV Unwrap
Horse Pole UV Unwrap
Small Balls UV Unwrap
Carousel Top UV Unwrap
Carousel Base UV Unwrap
Carousel Whole UV Unwrap
Stage Thirteen - Creating the Texture Maps in X-Normal
The next stage of the project after UV unwrapping was to take the high poly and low poly versions of both the horse and the carousel and take these into x-normal to create the necessary maps to use ready to create the textures in Quixel by baking. For me to be able to create the textures for my models in Quixel I baked a normal map, colour map, ambient occlusion map and a cavity map for both the horse and the carousel to take into x-normal. I found this stage quite confusing at first to set up the x-normal window but once done once I found the process easy and straight forward to follow through and repeat for each necessary map. After reviewing the maps in Quixel I had to do a clean up job of the colour map for the carousel as x-normal had created a few random holes in places where there wasn't supposed to be holes, so I simple loaded this map up in Photoshop and painted the matching colour over the holes so not to cause problems when applying textures in Quixel.
Carousel Ambient Occlusion Map
Cleaned Up Carousel Colour Map
Carousel Normal Map
Carousel Cavity Map
Carousel Horse Ambient Occlusion Map
Carousel Horse Normals Map
Carousel Horse Colour Map
Carousel Horse Cavity Map
Stage Fourteen - Creating Textures in Quixel
After creating my maps in x-normal I then took all of these maps into Quixel to create the textures for both my carousel and horse models. I firstly started off with the carousel model and plugged in the appropriate low poly mesh and maps I had created for this model, choosing to use the cavity map instead of ambient occlusion as it gives better results, and allowing Quixel to generate a project for me to work from. I then in the preview window within Quixel used the controls of C,Shift and selected each coloured section of the carousel one at a time and played around with applying textures to see what would give the best outcome. For the final carousel textures I decided on a glossy paint texture for the gold and blue sections on the carousel and after playing around with other wood textures for the white base found none suitable I tried using a plaster texture and found this worked just fine. Once I was happy with the textures on the carousel I then saved the project and exported out the final texture maps into a new folder ready to work from in Maya and Unreal 4. I then repeated the process with the horse half of the model and used the same plaster and glossy wood textures and exported ready for the next stage of the project. At this stage I am really happy with the overall look on each part of my model as it really matches the original reference image of my model and looks really realistic.
Quixel Carousel Horse Textures
Quixel Carousel Textures
Stage Fifteen - Taking the Textures back into Maya
For the next part of the project I then had an extra stage compared to most others models as I had to load up the low poly version of the carousel and duplicate the horse and horse pole back around the entire model to create the finished model once again. Once I had duplicated the horses and was happy with the placement I then added the textures onto the model in Maya. To apply the textures I firstly began with applying a lambent material to each piece of the model and then changing the colour to file and then applying the albedo file type from the final Quixel textures. I repeated this stage for each part of the model and once happy I then moved onto the next stage by taking the model and textures into the Unreal 4 engine. I found this stage of the project fairly quick and simple to do as it was just a case of duplicating and applying textures and was fairly straight forward. Overall at this stage I am really pleased with the overall model and how it is looking with the textures now applied.
Final Textured Carousel Model in Maya
Stage Sixteen - Taking the Carousel into Unreal 4 Engine
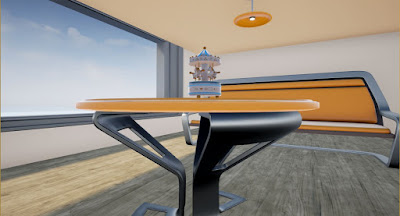
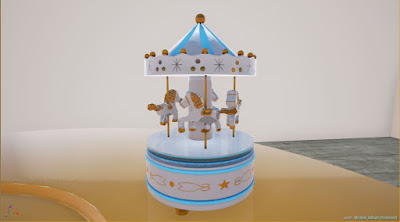
To complete the final stage of the project I then took my completed carousel model into the Unreal 4 engine and created a scene around the object to set the whole look. I firstly began this stage of the project by importing my model and all the associated texture maps. I then created a new material in the unreal engine and pasted the textures into the material editor window and then matched the texture maps according to the correct links. Once I had completed linking the textures I then dragged the carousel into the scene and dragged on the correct textures and then began by playing around with the given standard assets in unreal 4 to create a scene for my model. I decided to create a living room in a house for my scene and placed my carousel model on a coffee table in the centre of the room and applied the appropriate lighting to light my model. I found this stage of the project the easiest to complete and the most fun as it was just a simple process of linking the textures and creating a scene to show off the model and this really can be creative freedom to make the model look the best it could be. Overall I am really really pleased with my model in the engine and it looks super realistic in the engine and matches my original reference images very closely.
Final Carousel Model in Unreal 4 Engine
Summary of Project
Overall I found this project very challenging and have encountered many problems at each stage of the project. The project has taught me many new skills that I could practice and improve on in future and has taught me how long the process can be to complete assets for a Triple A game. I found the process very difficult and long and can't imagine how long it takes to create a whole game with this process. I'm sure with practice of this process I could speed up and improve and create some really interesting assets for games, however I have also decided this is not the specialism I enjoy and would like to continue with in the future for my career, although having the knowledge of this process could serve me well as a backup choice.


No comments:
Post a Comment